
.png)

Ever thought about what the internet is like for people who can’t see or can’t hear? What about those who can’t move their arms?
Many people take casual use of computers and access to the internet for granted. But they’re astounding, life-altering tools, and not having easy access to them is a remarkable hindrance.
That’s why, as the internet becomes even more ubiquitous, and as society bends rightly toward inclusivity, digital accessibility will become a bigger and bigger deal.
If your U.S.-based business has an online presence you must start the process of making your website ADA compliant. Not doing so shuts out millions of potential customers and opens you up to expensive—sometimes catastrophic—legal action.
That’s why we put together these 7 tips on how to make a website ADA compliant. But first, a little information about what is required to make a website ADA compliant. And at the very end, we’ll show you some great ADA compliant website examples.
What Is Required to Make a Website ADA Compliant?
What makes a website ADA compliant is not a blanket technical standard applied the same way to every web page. ADA web compliance is based on whether or not, under ADA website law, you can be judged as having applied a good-faith effort to make your website accessible to those with disabilities.
It’s relatively vague legalese that’s somewhat open to interpretation based on what a website can reasonably do. But the following 7 ADA compliance tips are how most businesses get there.
How to Make Your Website ADA Compliant: 7 Tips
How to make ADA compliant websites boils down to these 7 tips. Each tip on its own is a big stride forward toward ADA compliance. And, taken together, they’ll get you across the web accessibility finish line.
Maintain Clear Labeling and Logical Structure
Logically-structured content is easier to process. That applies to both machines and humans. And clearly-labeled content that’s structured logically is the ideal.
Think of any outline you’ve ever created. The biggest, broadest topic is first. Then subtopics branch out underneath it. And if necessary, further subtopics branch out underneath those. The entire hierarchy, clearly labeled, flows downward from general to specific—all about one related topic.
Assistive technologies like screen readers need clear, organized, and intuitive content structure to work optimally. Here’s how to give it to them:
- Identify and markup Page Regions in your HTML using either HTML5 or ARIA landmarks. At its most basic, this means making sure that your web page’s header section contains the HTML <header> element. The footer section, the <footer> element, and so on.
- Add headings of appropriate semantic depth and nest them all logically. Content should follow the example of a simple, intuitive outline. The first, largest header should be the broadest term. The second header, nested beneath the first, a more specific term, and so on.
- Mark up content sections with descriptive HTML elements, like <article> and <section>. The more information you can give assistive technology about the structure of your website, the better.
By making your website easily understandable for software through transparent and logical structuring, you ensure the optimal performance of assistive technology.
Put Alt Tags On All Images
Every image on a web page is coded with an <img> HTML element.
Let’s take, for instance, an internet user with low visibility who uses a screen reader. As their screen reader crawls through the HTML of the page to understand its structure, it will likely encounter an <img> element. The screen reader knows an image is there, but it doesn’t know what the image is. There is nothing to read in the image’s HTML that communicates what the image is.
Enter the alt attribute, or alt tag. This is a piece of information inserted into the <img> element that briefly describes the image. If a screen reader encounters an image element with an alt tag, it can read the description to the user. Here’s an example of an <img> tag with alt text for a picture of a dog eating a hot dog:
<img src="img_dog.jpg" alt="Dog eating a hot dog" width="500" height="600">
Many content management systems make it easy to add alt text to every image published right in the editor.
Add Captions and Subtitles
Captions are text versions of the non-text audio components of a given piece of media. Most of the time, these are closed captions, which means they can be toggled on and off. Open captions, on the other hand, are always visible and can’t be turned off.
Subtitles is typically the term used when spoken audio is translated to another language, though subtitles are implemented in much the same way captions are.
Both captions and subtitles are beneficial for any user who processes written information easier than audio, whether hearing or cognitively impaired.
Automatically-generated captions don’t cut it, unless it’s confirmed that they’re 100% accurate and representative of the non-text content. They’re usually far from it. Turn the captions on on the next YouTube video you watch and see for yourself.
Most organizations outsource audio transcription and caption/subtitle creation because it requires special software and skills. It’s nevertheless one of the most impactful and immediate changes a site can make in its pursuit of ADA compliance—especially if that site has a lot of non-text content.
Color Contrast Is Color Accessibility
A large part of accessibility is simply being able to see the content on the page. And your website’s color and contrast are a massive part of that.
The WCAG includes a contrast ratio, which is the difference in perceived brightness between two colors. A 1:1 contrast ratio is white-on-white. A 21:1 contrast ratio is the standard black-on-white. The higher the contrast ratio, the easier the colors are to differentiate, the more accessible the content is.
To be WCAG 2.1 AA compliant, for example, the visual presentation of text requires a contrast level of at least 4.5:1.
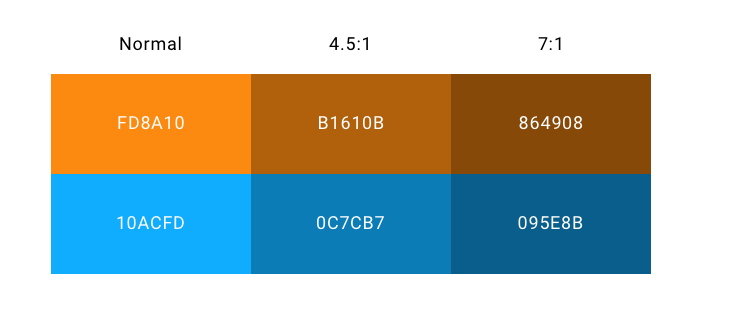
Many factors besides color affect contrast ratio. Whether text is bold, italicized, using shadow or halo, for example. The only text that need not comply with contrast ratios is inactive text (like a disabled button), purely decorative text, hidden text, or background text in images (like a traffic sign) that aren’t meant to communicate anything meaningful.
You can check your contrast ratio here.
Use an ADA Compliance Website Checklist
For most businesses, an ADA compliance website checklist is a WCAG checklist. That’s because building toward ADA compliance is typically a function of checking individual web pages against the WCAG 2.0 or 2.1 standards. Version 2.1 is a bit more recent and is updated to reflect some changes to technology. It’s also referenced in over 75% of federal ADA non-compliance claims.
Those web accessibility standards can be somewhat confusing, though. And there are some other ADA compliance website checklists, like Essential Accessibility’s, that make the process a little more user friendly.
At present, the web accessibility standards in the WCAG 2.1 organized into four general principles:
- Perceivable. Information cannot be undetectable by every sense; it must be perceivable in some way to everyone.
- Operable. The user interface cannot require interaction that someone can’t perform; it must be operable.
- Understandable. The information must be easily understood. Operating the user interface or interacting with the web page should not require deep technical knowledge.
- Robust. Information and content should be able to be interpreted reliably by users with a wide variety of ability, which includes assistive technology.
It’s a good idea when using an ADA compliance website checklist to make sure each webpage you’re checking hits these four WCAG principles. And the web accessibility standards themselves—along with their associated technical instruction and examples—provide specifics for doing so.
Conduct an Audit
A manual web accessibility audit is the meat behind how to check if a website is ADA compliant. It’s the systematic checking of each web page against your ADA compliance website checklist. And it is, hands down, the most reliable way to make a website ADA compliant.
Automated ADA compliance tests (i.e. a web accessibility checker or ADA compliance checker) can point you in the right direction and show you the biggest, brightest accessibility red flags on your site. But the only way to truly flip an inaccessible site into an ADA-compliant site is for a professional to manually audit each page to tease out every single little technical issue.
Those professionals will often use automated accessibility testing sites to supplement their manual audit. But the meat of a website’s journey to accessibility will always be a thorough manual audit. That’s because the only true way to know if a website is accessible is for a human being to make that designation. There is no cookie-cutter technical fix to apply, en masse, to websites. Each inaccessible website is inaccessible in its own way. And that nuance cannot be identified and resolved by software alone.
Pay for Website Remediation or Web Accessibility Remediation
Website accessibility remediation is the act of fixing—remedying—a website’s accessibility problems.
Typically, you’ll use automated accessibility checkers, run manual ADA compliance audits, and check your website against WCAG and ADA compliance website checklists. The end result of all that hard work is a list of points of failure: where your website fails to meet web accessibility or PDF accessibility standards.
A professional ADA website accessibility solution professional—or an auditor—will put together a report with all the points of failure and areas of opportunity for your website. They’ll also often include technical guidance along with coding examples for how a developer can solve those issues.
But remediation isn’t cheap. Not 508 remediation or ADA remediation. And it’s a cost that’s totally separate from the audit used merely to identify what needs remediation.
A basic website accessibility solution, in fact, can cost thousands and thousands of dollars. For a simple informational website (not ecommerce) with three different types of web pages that’s updated weekly, total remediation cost is around $12,000 per year. The more complex a website, the more pages it has, and more frequently updated it is all conspire to drive that price tag way up, too.
ADA Compliant Website Examples
Take a look at some examples of businesses doing a lot of the above correctly. That should give you a feel for how your website stacks up and what your biggest areas of opportunity are. This is how to make a site ADA compliant.
AirBNB.com
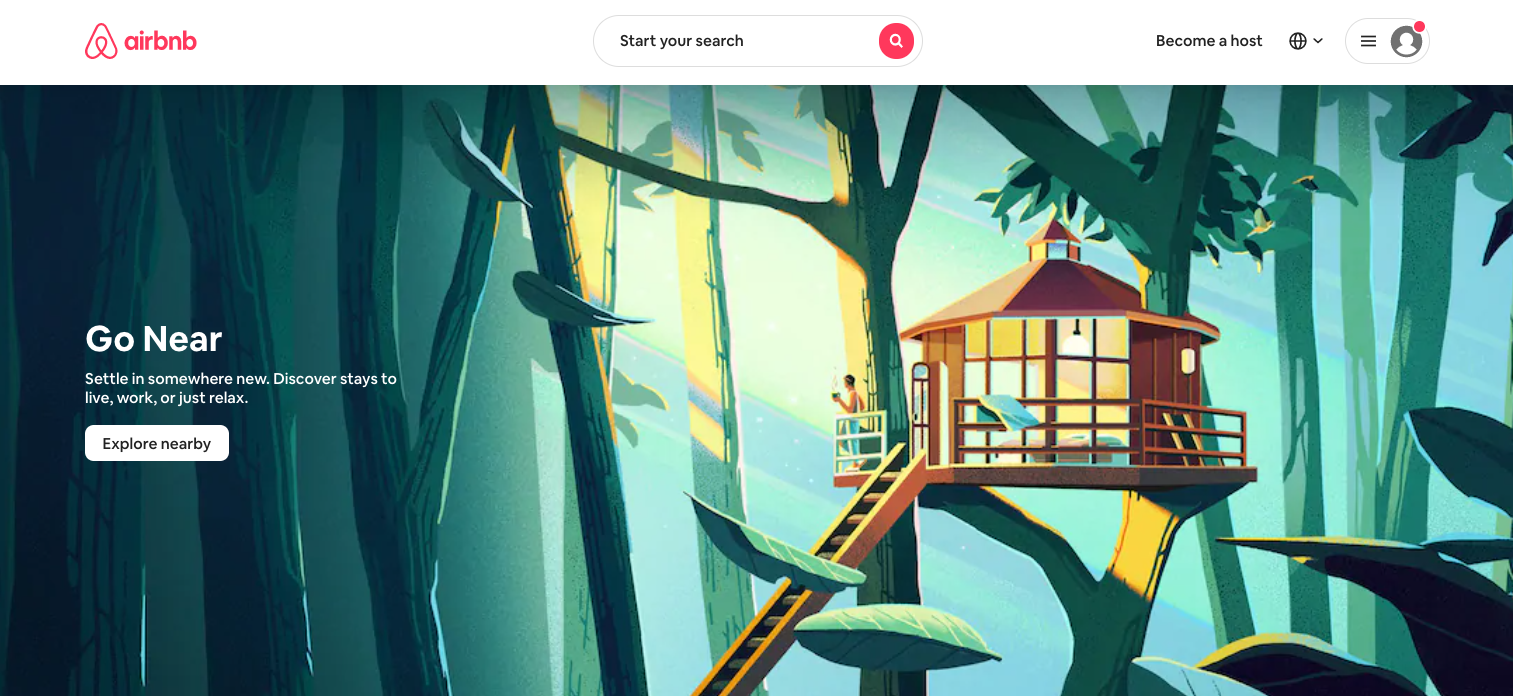
AirBNB states explicitly that they work toward WCAG guidelines (in what's known as a website accessibility statement), and it shows. Their contrast ratios are high and they’ve got a transparent and logical content structure. Behind the scenes, they’ve also labeled images and regions with optimal metadata for assistive technology.
Toyota.com

The Toyota website is another one of the best ADA compliant websites out there. That is, after all, to be expected from a company with Toyota’s resources. They have good contrast ratios, logical and consistent navigation options, and alt tags added. In fact, here’s an actual piece of code from Toyota’s website showing an alt tag in action:

That’s How to Make a Website ADA Compliant
Following these tips will ultimately result in an ADA compliant website. Alt text, contrast ratio, logical structure, these are some of the most impactful web accessibility changes you can make. But the last tip is the most important. It’s too risky to assume you’ve made an ADA compliant website on your own. The keen eye and steady hand of a manual ADA compliance auditor is the only way to get across the finish line.
And, let’s face it, that’s expensive. For bars and restaurants, there’s an easy, affordable way to do it, though. That’s partnering with a technology company that makes ADA-compliant QR code menus. Having a lightweight, hygienic, and accessible digital menu is one of the lowest hanging fruits for hospitality businesses in their quest for ADA compliance.
SproutQR creates one of the industry’s only ADA-compliant restaurant menus. For around $1 a day, you save yourself the pricey (and recurring) hassle of auditing and remediation. For around $1 a day, you:
- Make it possible for people with disabilities to easily find and interact with your menu
- Protect yourself and your business from costly legal action
- Save the mounting cost of printing single use menus, which the CDC recommends using now
- Give your restaurant’s digital menu a huge boost in Google rankings because the same structural best practices that help assistive technology understand your web pages help Google’s crawlers understand your web pages
If you’re a bar or restaurant, there’s no reason not to roll out SproutQR’s ADA-compliant QR code menu.